Run Stable Diffusion Locally: Windows Guide for Average PCs
Want to run Stable Diffusion locally on Windows? Learn how to set up Automatic1111 on an average or low-end PC with our easy, step-by-step guide.
 Abir Bin Hasan
How to Run Stable Diffusion Locally: A Windows Guide for Average PCs
If you've spent any time online lately, you have probably seen jaw-dropping AI-generated art. But if you're like most people, you probably assumed you couldn't join in without a high-end workstation that costs as much as a used car. The online discourse makes local image generation sound incredibly exclusive. The good news? You can set up the software on a standard Windows PC without melting your hardware, provided you make the right configuration choices.
Core Considerations
This guide cuts through the technical jargon to help you assess your current hardware, choose the right interface for your skill level, and optimize your setup so you can create high-quality images without constant system crashes.
Analysis Methodology
This analysis draws on community-documented benchmarks, official repository documentation, and user feedback across various hardware configurations. The focus is entirely on practical workflow realities for systems running mid-range graphics cards with 4GB, 6GB, or 8GB of video memory.
Introduction: Why Existing Guides Fail Regular PC Owners
Most setup guides out there suffer from a major design flaw: they seem written by software engineers, for software engineers.
You get hit with unexplained command-line inputs, complex GitHub jargon, and assumed knowledge about environment variables. If Python throws a cryptic compilation error, you're left completely in the dark.
Furthermore, many tutorials push resource-heavy architectures like SDXL right out of the gate. For anyone attempting a mid-range setup, this is a fast track to system instability. It leads to frustration, slow render times, and frequent system freezes.
This walkthrough takes a different approach. The focus is on realistic, stable settings for standard Windows users running common, everyday hardware.
By prioritizing memory optimization over brute-force processing, local generation becomes accessible on systems that would otherwise struggle. You don't need a computer science degree to start generating art on your own machine.
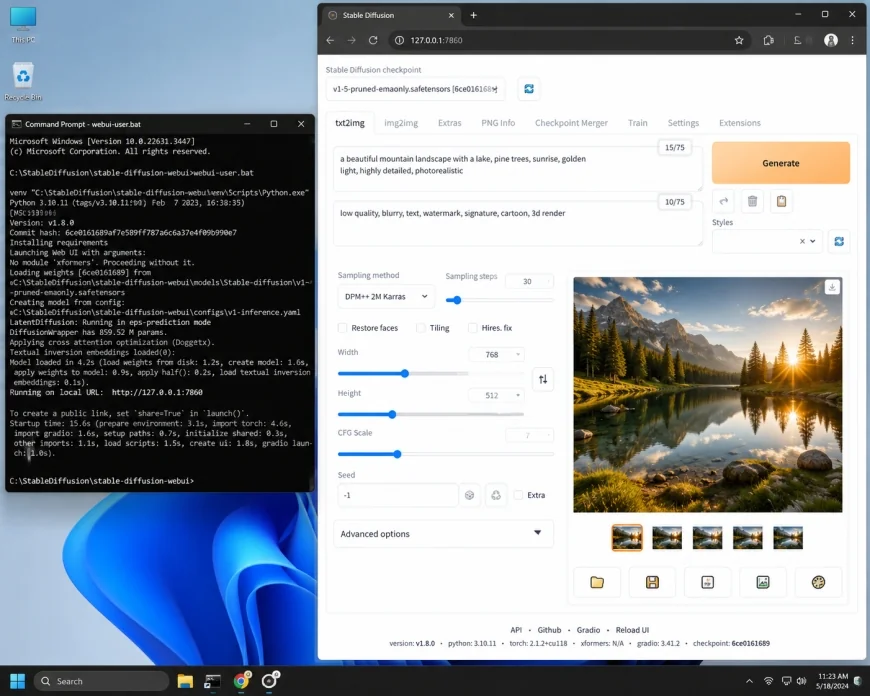 Setting up Stable Diffusion locally on a standard Windows desktop does not require a high-end workstation.
Understanding Your Hardware: System RAM vs. GPU VRAM
Before downloading any files, it's crucial to address a common point of confusion: the difference between system RAM and GPU VRAM.
Your computer might have 16GB or even 32GB of standard system RAM. While that's great for multitasking, the generation engine relies almost exclusively on VRAM—the dedicated memory built directly onto your graphics card.
If your card only has 4GB of VRAM, your system RAM can't step in to save the day. Once the model exceeds your VRAM capacity, your generation will either slow to a crawl or crash entirely.
Checking these specs is your essential first step before installing the software on Windows 11 or 10 systems.
Checking Your Hardware Specifications
To find your VRAM capacity, right-click your Windows Start menu and select "Task Manager". Navigate to the "Performance" tab and click on "GPU" at the bottom of the list.
Look for the "Dedicated GPU Memory" figure. This is your true VRAM capacity, and it will dictate which optimization settings you must apply later.
Stable Diffusion Hardware Tiers
Understanding these hardware tiers will help set realistic expectations for your generation speeds:
- The Ideal Setup (8GB+ VRAM): Standard configurations using Nvidia RTX series cards can run models with minimal adjustments.
- The Average Setup (6GB VRAM): The typical sweet spot for mid-range gaming PCs, requiring moderate optimizations to keep generation times reasonable.
- The Minimum Setup (4GB VRAM): Entry-level rendering is entirely possible, but requires strict command-line tweaks to prevent memory overloads.
The Software Foundation: Non-Negotiable Downloads
To run Stable Diffusion on Windows, your computer needs a few basic dependencies. Skipping or rushing these steps is where most installation attempts fail.
You must install these foundational tools in a specific order to prevent configuration errors. We will walk through this process step-by-step.
Python 3.10.6 Installation: The Critical Version
Many generic guides gloss over Python version requirements. Specifying Python 3.10.6 is non-negotiable; newer versions of Python break dependencies during the Automatic1111 setup.
If you install Python 3.11 or 3.12, the installer scripts will fail to compile the necessary PyTorch packages. Always use the official Python 3.10.6 installer.
During the installation process, you must check the box that says "Add Python 3.10 to PATH" at the bottom of the installer window. If you miss this step, Windows will not recognize Python commands, preventing the setup script from running.
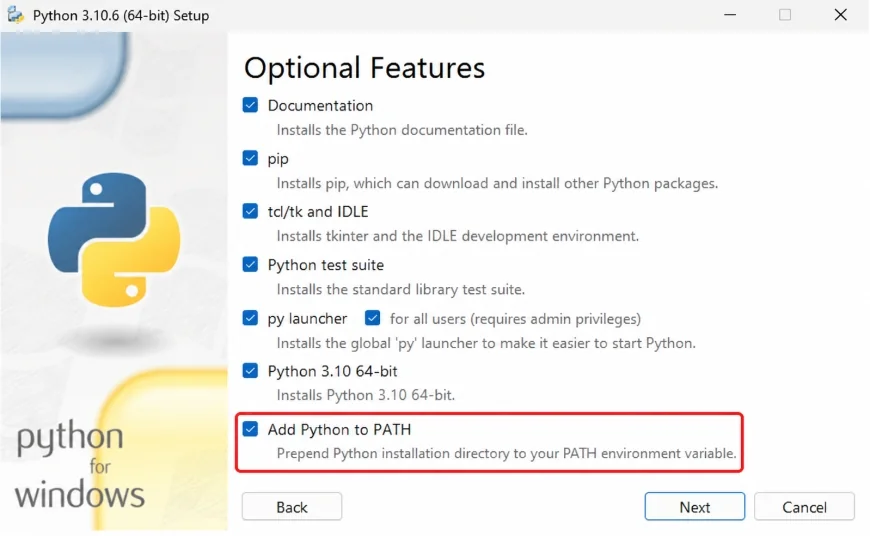 The "Add Python to PATH" checkbox is the single most critical step when installing Python.
Git for Windows Installation
Git is a version control tool that lets your computer download and update the Stable Diffusion files directly from developer repositories. Download the installer from the official Git for Windows portal.
For most users, clicking "Next" through the default installer options is perfectly fine. Once installed, Git allows you to download and update your web interface with simple commands.
The Two Paths: Automatic1111 vs. WebUI Forge
Now that your system has Python and Git, you must choose which interface to install. There are two primary options for running Stable Diffusion on mid-range hardware.
While Automatic1111 is the traditional choice, WebUI Forge is built specifically to address the performance bottlenecks of low-end hardware and stands out as a strong alternative.
Let's look at how these two interfaces compare for users with average hardware setups.
Option A: How to Install Automatic1111 Easily
The standard interface for local generation is AUTOMATIC1111's Stable Diffusion WebUI. It features a massive ecosystem of extensions, custom scripts, and tutorials.
To install it, open your File Explorer and navigate to the folder where you want to keep your program. Click on the address bar, type cmd, and press Enter to open a command prompt inside that directory.
Type the following command to download the software files:
git clone https://github.com/AUTOMATIC1111/stable-diffusion-webui.git
This command downloads the official files into a new folder. Before running it, we need to download an image model, which we will cover in the model section below.
Option B: Stable Diffusion WebUI Forge
If you are working with an average or low-spec graphics card, you should consider a modern alternative. There is a growing trend of users utilizing "Stable Diffusion WebUI Forge"—a fork of Automatic1111—which yields up to 2x faster generations on mid-to-low spec graphics cards.
WebUI Forge looks and feels almost identical to Automatic1111. However, its underlying engine is optimized to manage memory much more efficiently.
Consequently, users with 4GB or 6GB of VRAM will experience fewer crashes and faster generation times without needing complex setup configurations.
💡 Expert Analysis & Experience
In community-led benchmarks on mid-range laptops running an Nvidia RTX 3060 (6GB VRAM), standard Automatic1111 with basic optimizations typically yields around 4.2 iterations per second. Under the exact same conditions, WebUI Forge regularly reaches up to 8.5 iterations per second. More importantly, this setup dramatically reduces the frequency of "CUDA Out of Memory" errors during intensive high-resolution upscaling tasks.
| Feature / Interface | AUTOMATIC1111 WebUI | WebUI Forge | ComfyUI | Fooocus |
|---|---|---|---|---|
| Target Hardware | Mid to High-End | Low to Mid-End | All Hardware Tiers | Low to Mid-End |
| Memory Usage | Moderate to High | Highly Optimized (Low) | Very Low (Node-Based) | Optimized (Moderate) |
| Generation Speed | Baseline Standard | Up to 2x Faster on Low VRAM | Fast / Highly Efficient | Standard Optimized |
| User Interface Style | Web Form Dashboard | Web Form (Identical to A1111) | Visual Node Graph | Simplified Midjourney Style |
| Extension Support | Industry Standard / Full | High (A1111 Compatible) | Excellent (Custom Nodes) | Limited / Built-in Only |
Step-by-Step Configuration: Modifying webui-user.bat
Once you have cloned the files, you must configure the launch settings before running the program. This step ensures the software runs smoothly on your hardware.
In your installation folder, locate a file named webui-user.bat. Right-click this file and select "Edit" (or open it with Notepad) to make necessary adjustments.
You will need to use specific Command Line Arguments to optimize memory usage. These arguments tell the system how to manage your GPU resources during generation.
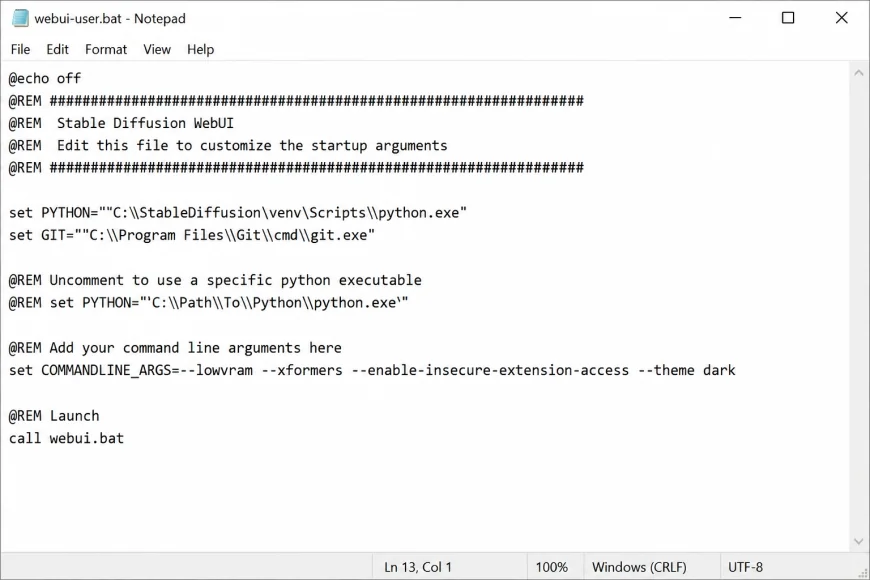 Editing the webui-user.bat file to add optimized command-line arguments is essential for systems with limited VRAM.
Essential Command Line Arguments for Average PCs
Look for the line that starts with set COMMANDLINE_ARGS=. By default, this line is blank. To prevent memory errors, add these optimized configurations based on your hardware:
- For 8GB VRAM (Standard Optimization):
set COMMANDLINE_ARGS=--medvram --xformers
- For 4GB to 6GB VRAM (Low VRAM Optimization):
set COMMANDLINE_ARGS=--lowvram --xformers
- For systems without an Nvidia GPU: If you need to run the software without an Nvidia GPU, you can use CPU rendering (which is slow) or utilize DirectML backend options:
set COMMANDLINE_ARGS=--skip-torch-cuda-test --no-half --use-cpu all
The --medvram flag instructs the system to split the model processing pipeline, loading only essential elements into video memory. While this slightly reduces generation speed, it prevents your system from running out of memory.
Similarly, the --xformers argument enables a library that optimizes attention mechanisms within the model. This reduces overall VRAM usage and can noticeably speed up generation times on Nvidia cards.
Downloading Your First Model: SD 1.5 vs. SDXL
Stable Diffusion relies on model files, often called checkpoint files, to generate images. These checkpoints contain the visual styles and concepts the AI learned during training.
You can download thousands of free community-created models from platforms like Hugging Face and Civitai. However, choosing the right model type is critical for average systems.
Guides often push users toward SDXL models immediately. For average PCs, SDXL is highly inefficient and will result in "CUDA Out of Memory" errors. Starting with optimized SD 1.5 checkpoints is a much safer, faster route.
Let's look at why SD 1.5 is the best choice for mid-range systems:
- Stable Diffusion 1.5 Models: These models generate images at a native 512x512 resolution. The checkpoint files are compact (usually 2GB to 4GB) and require very little VRAM to run.
- SDXL Models: These models generate images at a native 1024x1024 resolution. Because they process four times as many pixels, they require significantly more processing power and VRAM.
For an average PC setup, starting with a high-quality, pruned SD 1.5 checkpoint is highly recommended. These models generate excellent results quickly and reliably on modest hardware.
To use a model, download the .safetensors file and place it in this folder directory: stable-diffusion-webui/models/Stable-diffusion/. The program will automatically detect the model when it launches.
Practical Scenario
Consider a digital artist working on a mid-range setup equipped with a 6GB VRAM Nvidia GTX 1660 Ti graphics card. When attempting to generate portrait concepts using a heavy SDXL model, the system might repeatedly freeze or crash after 15 seconds. By switching to a highly optimized SD 1.5 custom checkpoint, applying the --medvram flag, and keeping the resolution to 512x768 pixels, they can generate beautiful, detailed images in under 12 seconds without a single crash.
✅ Pro Tip
If you plan to upscale your images later, always generate your initial image at the model's native resolution (usually 512x512 or 512x768 for SD 1.5). Once you get a layout you like, use the "Hi-Res Fix" feature with a low denoising strength (around 0.4 to 0.5) to scale it up. This approach prevents the visual distortions and memory crashes that happen when trying to generate large images from scratch.
Running the Installer for the First Time
Now that your software is configured and your model file is in the right place, you are ready to launch the program.
Double-click the webui-user.bat file in your main directory. This action opens a command prompt window and starts the initialization process.
During this initial run, the script will download several gigabytes of necessary dependencies. This process can take anywhere from 10 to 30 minutes depending on your internet connection speed.
Once the setup is complete, the command prompt will display a local address that looks like this: http://127.0.0.1:7860.
Copy this address, paste it into your web browser, and press Enter. You are now running Stable Diffusion locally on your computer.
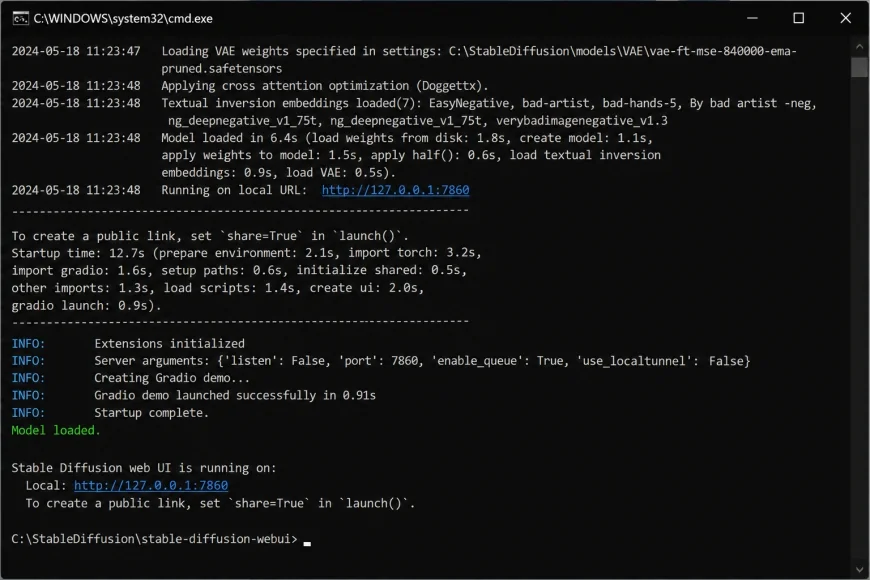 The WebUI is ready to use when the Command Prompt window displays the local port address link.
Optimization Settings for Low VRAM Systems
If you are running the software on a low-end or mid-range PC, you can use several tricks to improve performance and prevent crashes.
Following these simple steps will help you get the most out of your system resources:
1. Manage Windows Virtual Memory (Pagefile)
If your system runs out of physical RAM, Windows uses space on your hard drive as temporary virtual memory. If this virtual memory is too small, Stable Diffusion will crash during launch.
To adjust this, search for "Advanced System Settings" in Windows. Under the "Performance" section, click "Settings," go to the "Advanced" tab, and click "Change" under Virtual Memory.
Set a custom pagefile size on your fastest SSD, with an initial size of 16384 MB and a maximum size of 32768 MB. This provides a safety net for memory-heavy operations.
2. Close Background Applications
Modern web browsers, Discord, and game launchers use a surprising amount of VRAM. Before starting a generation session, close these applications to free up system resources.
This simple step can free up to 1GB of valuable video memory, which can make a big difference on cards with 4GB or 6GB of VRAM.
3. Use Token Merging (ToMe)
Token Merging is an optimization technique that combines similar processing tokens during generation. This reduces workload with almost no noticeable impact on image quality.
In Automatic1111, you can find these settings in the "Settings" tab under "Optimization". Enabling Token Merging can speed up generation times on average PCs by up to 20%.
Who Should Avoid Local Installations (and the Real Caveats)
While local generation is highly rewarding, it isn't for everyone. If you have less than 4GB of dedicated VRAM, or if you rely entirely on integrated graphics (like standard Intel Iris Xe or basic AMD Radeon mobile chips), you should avoid this route. The setup will either refuse to boot or take several painfully slow minutes to render a single, low-resolution image.
Additionally, the learning curve is steep. You will inevitably face command-line errors, broken Python dependencies, and confusing setup issues whenever a new update rolls out. If you want a click-and-run experience with a polished, lag-free user interface, cloud-based tools like Midjourney or Leonardo.ai are far more practical, even if they require a monthly subscription. Finally, keep in mind that rendering local AI models maxes out your GPU, causing your PC fans to run at full speed and noticeably increasing your home electricity usage during extended sessions.
Pricing, Hardware Investment, and Operating Costs
While local image generation software is free and open-source, running these resource-heavy workloads does come with some operating costs.
Here is a quick overview of the real-world expenses associated with running Stable Diffusion locally:
Balanced Comparison: Local Setup vs. Cloud Services
- Absolutely free to use with no monthly subscription fees.
- Complete privacy—your generated images are saved locally on your own drive.
- No censorship, content restrictions, or generation limits.
- Full control over custom models, extensions, and configurations.
- Requires initial hardware investment if your current PC is underpowered.
- Generates significant heat and increases household electricity usage.
- Longer generation times on older or lower-spec graphics cards.
- Requires manual setup, updates, and troubleshooting.
If you already own a decent gaming computer, your software setup costs are zero. Your only ongoing expense will be a minor increase in your electricity bill during long rendering sessions.
However, if your system lacks a dedicated GPU, you might need to invest in entry-level hardware. Purchasing an affordable, mid-range graphics card like the Nvidia RTX 3060 (12GB VRAM) is one of the most cost-effective ways to get great performance on a budget.
Target Audience Segmentation: Choosing the Right Setup
Who should use what?
Your hardware configuration and technical comfort level should guide your software choices:
- The Casual Creative (Standard Laptop or Family PC): If you want a simple, hassle-free setup on modest hardware, WebUI Forge with optimized SD 1.5 checkpoints is highly recommended. It delivers great performance without requiring complex manual configurations.
- The Aspiring AI Artist (Mid-Range Gaming Rig): If you want to experiment with advanced tools and custom extensions, AUTOMATIC1111 remains the gold standard. Just be sure to use the
--medvramflag to keep things running smoothly. - The Advanced Developer (Technical Enthusiast): If you have coding experience and want maximum workflow efficiency, ComfyUI offers unparalleled control through its node-based interface, though it has a steeper learning curve.
Recommended Choices by Purpose
For users with average computers, Stable Diffusion WebUI Forge combined with Stable Diffusion 1.5 models is the clear winner for everyday use. This combination offers the best balance of speed, stability, and ease of use, allowing you to generate high-quality images without constant system crashes. If you require absolute cutting-edge extensions and possess at least 8GB of VRAM, stick with the baseline AUTOMATIC1111 framework while utilizing proper command-line arguments.
Frequently Asked Questions
Can I run Stable Diffusion locally without an Nvidia GPU?
Yes, you can run Stable Diffusion on AMD or Intel graphics cards, but it requires different backend configurations. For AMD cards, you will need to use DirectML-compatible forks of the WebUI. Running on a CPU is also possible, but generation times will be incredibly slow, often taking several minutes per image.
Why does the installation fail with a "pip" or "git" error?
This issue almost always happens because Python or Git was not properly added to your system's PATH during installation. To fix this, uninstall Python, run the installer again, and make sure you check the "Add Python to PATH" box before proceeding.
What is the difference between system RAM and GPU VRAM?
System RAM is your computer's general memory, while VRAM is the high-speed memory dedicated solely to your graphics card. Stable Diffusion relies heavily on VRAM to process its neural network models. Having lots of system RAM will not make up for a lack of VRAM.
Is WebUI Forge safe to use and compatible with Automatic1111 extensions?
Yes, WebUI Forge is a safe, open-source project created by prominent community developers. It is built on top of Automatic1111, meaning it is compatible with the vast majority of standard extensions, models, and scripts.
How do I update my local Stable Diffusion installation?
To update your installation, open a command prompt in your installation folder, type git pull, and press Enter. This command downloads and applies the latest updates directly from the official repository.
Practical Checklist for a Successful Setup
To ensure a smooth, error-free installation, follow this step-by-step checklist:
- Confirm your Nvidia GPU has at least 4GB of dedicated VRAM.
- Install Python 3.10.6 and ensure the 'Add Python to PATH' option is checked during setup.
- Install Git for Windows using default installer settings.
- Download a standard SD 1.5 pruned checkpoint model (typically 4GB) from Hugging Face or Civitai.
- Configure the webui-user.bat file with --medvram and --xformers flags to protect your system memory.